R-Drive Image 7.0 Build 7003 + BootCD

R-Tools R-Drive Image review

R-Drive Image is a potent utility providing disk image files creation for backup or duplication purposes. A disk image file contains the exact, byte-by-byte copy of a hard drive, partition or logical disk and can be created with various compression levels on the fly without stopping Windows OS and therefore without interrupting your business. These drive image files can then be stored in a variety of places, including various removable media such as CD-R(W)/DVD, Iomega Zip or Jazz disks, etc.
R-Drive Image restores the images on the original disks, on any other partitions or even on a hard drive’s free space on the fly. To restore system and other locked partitions R-Drive Image is switched to the pseudo-graphic mode directly from Windows or bootable version created by the utility is launched from CD disc or diskettes.
Using R-Drive Image, you can completely and rapidly restore your system after heavy data loss caused by an operating system crash, virus attack or hardware failure. You can also use R-Drive Image for mass system deployment when you need to setup many identical computers. In other words, you can manually setup one system only, create an image of the system, and then deploy it on all other computers, saving your time and costs. If you need to restore only certain files from a disk image, you can connect that image as a virtual disk and copy those files directly from the disk image using Windows Explorer or any other file utility.
R-Drive Image is one of the best backup and disaster recovery solutions to prevent losing your data after a fatal system failure.

Key Features:

  • A simple wizard interface – no in-depth computer management skills are required.
  • On-the-fly actions: Image files are created on-the-fly, no need to stop and restart Windows. All other disk writes are stored in a cache until the image is created. Data from image files are restored on-the-fly as well, except on a system partition. Data to the system partition can be restored either by restarting
  • R-Drive Image in its pseudo-graphic mode directly from Windows, or by using specially created startup disks.
  • Image files compression. Image files can be compressed to save free storage space.
  • Removable media support. Image files can be stored on removable media.
  • Startup version. A startup version can be used to image / restore / copy partitions locked by the OS. The computer can be re-started into the startup version either directly from Windows, or from an external USB device, a CD/DVD disk, or 6 floppies. The startup version can use either a graphic user interface, or a pseudo-graphic mode, if the graphic card isn’t supported.
  • USB 2.0 and 3.0 support in the startup version. With hard drives prices constantly going down, an external IDE-USB 2.0 or 3.0 HDD case with an appropriate hard drive is an ideal (fast and reliable) solution for storing backup files for system and other partitions that can be restored only in the startup version. Do not use numerous unreliable CD discs and slow CD/DVD recorders any more. Remember: with the incremental backup, this hard drive is not to be too large.
    Network support in the startup version. R-Drive Image startup version supports disk image file creation and restoration over the Microsoft network (CIFS protocol).
  • Extended List of the supported devices in the startup version. The list of hardware supported by R-Drive Image startup versions has been extended. VIEW THE LIST
  • An image file can be connected as a read-only virtual disk. Such disk can be browsed through and files/folders can be found and copied.
  • Individual files and folders restoration. Individual files and floders rather than entire disk can be restored either during the restoring action or from a image file connected as a virtual disk.
  • Image files splitting. Drive images can be split into several files to fit a storage medium.
  • Image Protection. Disk image files can be password-protected and contain comments.
  • New partition creation. Data from a disk image can be restored on a free (unpartitioned) space on any place on a hard drive. The size of the restored partition can be changed.
  • Partition replacement. Data from a disk image can be restored on other existing partitions. R-Drive Image deletes such partitions and restores data on that free space.
  • Disk to Disk copy. An entire disk can be directly copied on another one.
  • Image files verification. You may check if your image files are good before you store them or restore data from them.
  • Scheduler. A time for disk image creation may be scheduled and the process can be run in unattended mode.
  • Script creation for frequent or unattended actions. Such scripts for creating an image file and appending data to an existing image file are created from the R-Drive Image interface the same way the actual action is performed. Scripts are executed from a command line and such command can be included to any command file.
  • Action Report. When disk image is successfully created or the action fails the report can be automatically sent over e-mail or an external application can be launched.
  • Support for the ReFS file system (Resilient File System), a new local file system Microsoft has introduced in its Windows 2012 Server. All disk actions are supported, except partition resizing.
  • Full support for the GPT partitioning layout. R-Drive Image can create GPT disks, resize them, and change their partition layout during copy/restore operations.

Whats New:

  • A new, completely redesigned wizard interface with improved graphical controls, drag and drop object manipulations, and visual source and target binding.
  • A partition manager that allows the user to delete, wipe, create, and re-size partitions and logical disks.
  • Image creation from individual files, not only from disk objects.
  • Advanced and versatile logs accessible directly from the user interface.
  • Advanced file filtering to make search for files and marking them easier. File filters can be created directly on a R-Drive Image panel or set/edited manually (Batch mode).
  • Support for rotation schemes (a further development of backup sets). A rotation scheme is a set of files (usually a file for a full image of an object and a number of its incremental/differential backups) which R-Drive Image treats as one unit. Rotation schemes are used to flexibly control the parameters of complex backup tasks. R-Drive Image supports predefined and custom rotation schemes. Custom rotation schemes are available in the Corporate, Technician, and Commercial licenses.
  • Support for the VMDK file type, a popular virtual machine disk format (only in Corporate, Technician, and Commercial Licenses).

Download R-Tools R-Drive Image 7.0 Build 7003 – (91.8 Mb)

https://www.upload-4ever.com/zn4hzocr41x3

Download R-Tools R-Drive Image 7.0 Build 7002 BootCD – (68.8 Mb)

https://www.upload-4ever.com/k087hct9i9js

How to crack windows Server 2008 administrator password

Boot to a Windows installation disk

press enter to install windows now

accept license

Start a repair

when you see the Installing Devices bar in the bottom left, press SHIFT + F10 to get a CMD prompt

At the CMD prompt type: “control userpasswords2” and in the password window set to no password required

Finish the repair

Then login as administrator with blank password

Create RAID Using PERC 6/i Integrated BIOS Configuration Utility(DELL)

Disk space is never enough. On an on-going basis system administrators will be getting request to increase the disk space on a server.

In this article, let us review how to add new physical disks and create a virtual disk with a RAID configuration on an DELL PowerEdge Server using PERC 6/i Integrated BIOS Configuration Utility.

The new DELL Servers has the ability to create RAID 0, 1, 5, 6 and 10 using the hardware controller.

Assume the scenario where the server came with 2 physical hard drives configured in RAID-1. This Logical Volume is where the operating system is installed and you got a request to expand disk space on this server. So, you have purchased additional disks and would like to configure a RAID setup. In this example, 4 additional disks are configured as RAID-5 on a DELL PowerEdge 2950 server. The same steps works on other DELL PowerEdge servers as long as you have the same PERC BIOS Configuration Utility.

1. Launch PERC 6/i Integrated BIOS Configuration Utility

First, insert all new disks in the empty slots. If there are already disks on slot 0 and slot 1, start inserting the new disks from slot 2. In this example, the new 4 disks are inserted from slot-2 to slot-5.

After the disks are inserted, reboot the server. When the server is starting up, press Ctrl-R to launch the PowerEdge Expandable RAID Controller BIOS. Press Ctrl-R when it is displaying the following message on the console.

Ctrl-R Launch RAID Controller on Dell PowerEdge T105 Server

Fig: Press Ctrl-R to Launch DELL PowerEdge 2950 III Expandable RAID Controller


This will launch the PERC 6/i Integrated BIOS Configuration Utility. This utility will have the following three TABs on the top.

  • VD Mgmt – Virtual Disk Management, which will be selected by default.
  • PD Mgmt – Physical Disk Management
  • Ctrl Mgmt – Controller Management

2. Create New Virtual Disk

From the Virtual Disk Management, use arrow key and select ‘Controller 0′. Press F2 to show available operations for the ‘Controller 0′.  This will display a pop-up menu with following choices.  Select ‘Create New VD’.

  • Create New VD
  • Clear Config
  • Foreign Config
  • Manage Preserved Cache

Create New VD Menu for DELL PowerEdge 840 Server

Fig: Create New Virtual Disk on DELL PowerEdge 1950 III Server


This will display the Virtual Disk Management screen with ‘Create New VD’ Panel. Following are the various sections displayed in this screen:

  • RAID Level
  • PD Per Scan
  • Physical Disks Section
  • Basic Settings
    • VD Size
    • VD Name
  • Advanced Settings
    • Stripe Element Size
    • Read Policy
    • Write Policy
    • Force WB with no battery
    • Initialize
    • Configure HotSpare

3. Choose RAID Level for the Virtual Disk

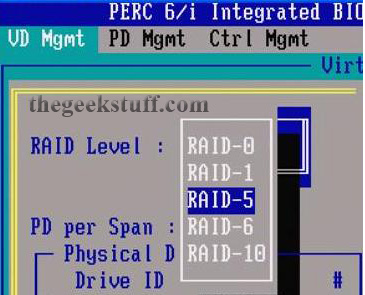
Press Enter on the RAID option, which will display the following RAID choices. In this example, I choose RAID-5 as shown in the Fig below.

  • RAID-0
  • RAID-1
  • RAID-5
  • RAID-6
  • RAID-10

Select RAID Level for Dell PowerEdge T100 Server

Fig: Select RAID Level in Create VD Screen for DELL PowerEdge 2970 Server

4. Select the Physical Disks for the Virtual Disk Group (RAID Group)

After selecting the RAID Level, press TAB and jump to Physical Disks section. This section will display all available disks that are not configured yet.  Every physical disks will display Drive ID and Size.

Press space bar to select the disks. i.e the check-box in front of the physical disk will be selected. Once you’ve selected one disk, it will automatically jump to the next available disk.  Keep pressing space bar until all available physical disks are selected as shown below.

Select All Physical Disks For Dell PowerEdge T300 Server

Fig: Select All available Physical Disk in Create VD Screen for DELL PowerEdge R900 Server

5. Set Virtual Disk Group Basic Settings

Since I have selected 4 disks (each 139G) for RAID-5, the total usable space would be around 3x139G, which is approximately 418176MB. This total size is calculated and displayed automatically in the VD Size under basic settings. You can also assign a name to the VD. I’ve left VD Name field blank.

Create VD Basic Settings for Dell PowerEdge T610 Tower Server

Fig: Enter Basic Settings in Create VD Screen for DELL PowerEdge R805 Server

6. Set Virtual Disk Group Advanced Settings

I recommend leaving all the advanced settings to the default values.

  • Stripe Element Size – Default value is 64KB
  • Read Policy – Default value is No Read Ahead
  • Write Policy – Default Value is “Write Back”
  • By default, following values are not checked. i.e check-box not selected
    • Force WB with no battery
    • Initialize
    • Configure HotSpare

Create New VD Advanced Settings For Dell PowerEdge 2900 III Tower Server

Fig: Enter Advanced Settings in Create VD Screen for DELL PowerEdge R905 Server

7. New Virtual Disk (Logical Disk Group) Created with selected RAID Level

Press TAB to jump to OK and press enter.  You’ll get the following warning message. Click OK to continue. This will successfully create the new Virtual Disk with RAID-5 configuration.

Warning Message: It is recommended that all newly created logical drives be initialized unless you are attempting to recreate a previous configuration and recover data as initialization is a destructive process.

8. Create New VD Full Screen with All Details

When you’ve entered all the above values, the whole Create New Virtual Disk Screen will look as shown below.

Create new VD Full Screen For Dell PowerEdge T605 Tower Server

Fig: Create New VD Full Screen for DELL PowerEdge R200 Server

9. New Virtual Disk – Initialization Progress

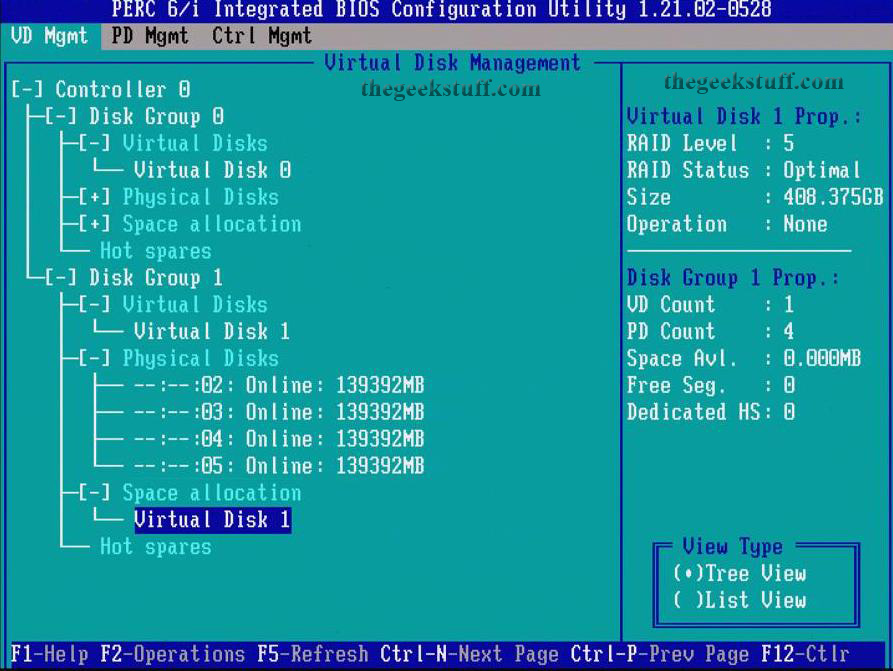
Once the VD is created, you’ll see a new ‘Disk Group 1′ under ‘Controller 0′. There will be a progress bar next to the ‘Virtual Disk 1′ showing the progress of the initialization.

Virtual Disk Status For Dell PowerEdge M710 Blade Server

Fig: Virtual Disk Initialization Progress for DELL PowerEdge R300 Server

10. View Disk Group and Virtual Disk Properties

Expanding Disk Group 1 will display the following sub-items.

  • Virtual Disks
    • Virtual Disk 1
  • Physical Disks
    • slot# : status : size
    • 02: Online: 139392MB
    • 03: Online: 139392MB
    • 04: Online: 139392MB
    • 05: Online: 139392MB
  • Space Allocation
    • Virtual Disk 1


Use arrow key and highlight the Virtual Disk 1, which will display the following properties of both Virtual Disk and Disk Group on the right side.

Virtual Disk 1 Properties:

  • RAID Level: 5
  • RAID Status: Optimal (This will display degraded if any one of the disk in RAID5 failed)
  • Size: 408G
  • Operation: None. (During initialization process, this will display the status accordingly)


Disk Group 1 Properties:

  • VD Count: 1 (This is number of virtual disks in the disk group 1)
  • PD Count: 4 (This is the total number of physical disks that are part of this disk group)
  • Space Available: 0.000MB (The total number of free space available to create a new Virtual Disk in this disk group)
  • Free Segment: 0
  • Dedicated HS: 0

Virtual Disk Status for PowerEdge M610 Blade Server

Fig: Virtual Disk and Disk Group Properties for DELL PowerEdge R710 Server


The new disk configuration is now complete and available at the OS Level. Make sure to format and partition this new Virtual Disk at the OS level before mounting it.

RAID Calculator

Computes the total hard drive space available in various RAID configurations

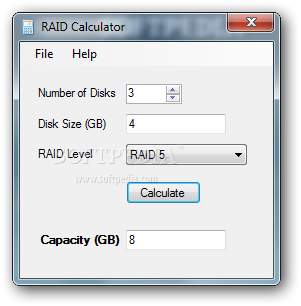
RAID Calculator is a handy and easy to use application that allows you to calculate the amount of hard disk free space in different RAID configurations.

You just have to set the number of disks and the disk size, choose the RAID level (RAID 1, RAID 5, RAID 0+1, RAID 10, RAID 50 or RAID 6) and press the ‘Calculate’ button. If you select the wrong number of disks for the chosen RAID type, the program notifies you.

The application is portable, thus it won’t require installation and won’t affect your registry.

Download Link:

http://www.softpedia.com/dyn-postdownload.php?p=223143&t=0&i=1

or

http://www.softpedia.com/dyn-postdownload.php?p=223143&t=4&i=1

Multiple remote desktop server

How to enable multiple remote desktop user logins in Windows 7

Windows remote desktop connection application can be used in order to connect to another PC on the same network or the internet. Both computers should use Windows and have the “Remote desktop connection” application available. For example, you can use all of your work computer’s programs, files, and network resources from your home computer, and it’s just like you’re sitting in front of your computer at work. You can also use it to access an application that is only installed on a single computer, by multiple users at the same time.

Windows 7 do not allow the concurrent use of a single computer by multiple users. This means that a user needs to be signed out before a second user logs in. This is not the case for the server editions of Windows. Luckily there is a patch that allows you to override this setting and connect multiple users at the same time on a single computer. The will even be able to use the same applications at the same time.

CAUTION: The following steps are probably going against the windows EULA agreement and could cause harm to your computer. I have already tested both of the patched below on windows 7 professional edition installations and could not find any issues.


Patch 1 (Does not work on Win 7 SP1)

The first patch just enables multi-user support for the Windows remote desktop connection tool:

  1. You need to download the following zip file: Win7RDP.zip.
  2. Unzip the contents in a folder (let’s say you have used the following path:  “C:\Win7RDP\”).
  3. Execute the file install.cmd by double clicking on it.
  4. You should see a screen similar to the one below, if everything works fine.Patch 1 sucessful execution screen
  5. After the end of the patching process the remote desktop connection of your pc provides multi-user support.


Patch 2

The following patch application lets you choose whether or not to enable multiuser support for the remote desktop connection process or/and to disable the no blank password policy that is enforced on users that need to connect remotely. Follow the steps below to access the application.

  1. Download the file Concurrent_RDP_Patcher_2-22-2011.zip
  2. Open the compressed file and execute the file “Concurrent RDP Patcher.exe”
  3. You should see the following screen
    Remote desktop concurrent connections patcher
  4. Check the desired options and then click the patch button.

Thats all.